


View the complete article here.
Sealcoating protects the life of asphalt pavement by sealing cracks, safeguarding it from natural elements, and helping vehicles drive safely across it. While it might look like a simple job, sealcoating has very intricate steps that need to be closely followed. Below are a few tips to ensure the task is done correctly.
6 Ways to Successfully Sealcoat
Choose the Right Material
There are a handful of sealcoating materials you can choose from.
Refined Tar
A refined tar sealcoat is one of the highest grades available and can withstand heavy traffic and harsh weather elements. However, refined tar does contain coal, something which can leave behind a strong smell. It also has hazardous polycyclic aromatic hydrocarbons that will eventually turn into dust and spread throughout the air and soil. While not the most eco-friendly, it’s a popular option thanks to its affordability.
Asphalt Emulsion
Asphalt emulsion is a petroleum-based option that is known to both seal and prevent cracks but doesn’t do well at protecting the surface from petrochemicals. Despite this, it tends to last longer than refined tar because it has more solid content that binds to the surface.
Specialty Resin
This type of sealcoat is similar to refined tar and will coat pavement to protect it from UV rays, rain, and numerous petrochemicals. One prominent component of it is epoxy which seals asphalt pores to prevent bubbling.
The correct sealcoat material to use will depend on the job and local regulations. For instance, if there are strict environmental laws, you might need to opt for a specialty resin sealcoat rather than refined tar.
You’ll also need to see if the sealcoat can be diluted with water or sand. If the task requires that the sealcoat be thinner or produce more traction, you need to make sure you can mix the sealcoat with them. If the sealcoat can’t, you’ll find that it will leave behind a filmy or bumpy appearance. Because of this, it’s important to check the sealcoat’s specifications to confirm it’s safe to do so.
Brainstorm Beforehand
You always need to examine the potential project well ahead of time to see what needs to be done. By doing so, you’ll be able to understand the current traffic flow, if the base is sturdy, and if there is surface contamination. This will give you a general idea of how long the job will take and how much sealcoat you’ll need to purchase.
Before you set a day for the job, check the weather. If the temperature is below 50℉ or if it’s a cloudy or rainy day, the sealcoat will be unable to dry and could wash away. Ideally, sealcoating is best done during the late spring and summer as the temperatures and weather tend to be more agreeable.
Prepare the Surface
Before you sealcoat, it’s crucial to prepare the surface which will allow the material to settle correctly. It will also prevent oil stains and other debris from being apparent once the sealcoat has been applied.
To prepare the surface, use a power washer to blow off mud and similar particles. If something lingers behind use a bristle brush to scrub it away.
After you wash it, walk around to see if there are cracks. While they might look small, if you don’t fill them in before you sealcoat, it will encourage them to grow. This will end up ruining the aesthetics of the new sealcoat and could lead to structural damage.
If you notice a crack, use a sealer to fill it in and then level it with a scraper. Always plan the job so that the sealer has about 10 hours to dry so it doesn’t get absorbed by the sealcoat. To ensure that the sealer is completely dry before you sealcoat it gently touch it. If it’s firm and doesn’t leave behind an indentation it’s set.
Do the Edges First
The edges of pavement tend to be one of the trickiest areas to sealcoat because they usually border grass or concrete. If you brush the sealcoat near it, the material could accidentally spread and make the job look uneven.
To prevent this, use a paintbrush or sealcoat sprayer to coat the edges. This will give you better precision so that the edges are properly covered while preventing damage to the surrounding landscape. If you want to cut down on the manual labor, you could instead fill a backpack pump sprayer with the sealcoat.
Always Apply Two Coats
Many make the mistake of only applying one coat because it looks like it has already sealed the surface. However, looks can be deceiving.
One coat might seem good, but it’s not practical because it will wear away quickly, especially in high traffic spots. If tires twist on the one-layer surface, they won’t have good traction and will shred the sealcoat.
Two coats also dry faster than one thick layer. If you only apply a single thick coat, it won’t dry correctly and will create different layers that will easily strip. This is why it’s best to apply two thin coats that will dry evenly.
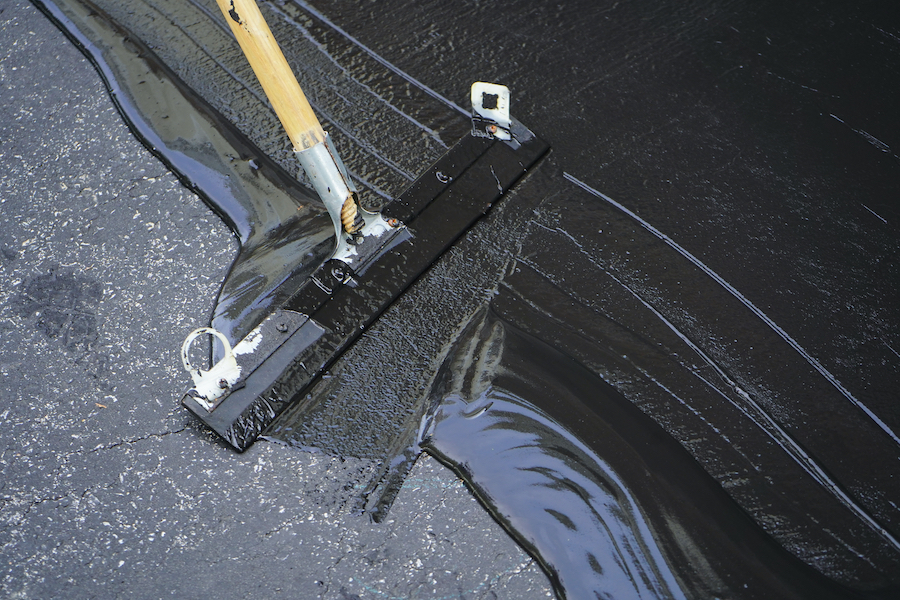
When you apply the coats, use a sealcoat squeegee that has a flat rounded edge to smoothly spread the material so it doesn’t leave behind lumps.
Block the Sealed Pavement and Turn Off Sprinklers
After you sealcoat the pavement, it’s important to barricade it so it has time to dry. Otherwise, if a car drives on it or someone walks on the surface, it could smear the sealcoat and create bumps. You should make sure there are cones or string to block the freshly-coated pavement for at least 48 hours.
In addition to this, make sure that any surrounding sprinklers are turned off for the day. If the water sprays on it, the liquid will remove parts of the sealcoat and make it harder for the material to dry.
Sealcoating is an important way to shield asphalt surfaces from oxidation, water damage, and heavy vehicle usage. However, if not done correctly, it could end up causing more harm than good. By keeping these tips in mind, you can confidently complete a sealcoating job.
View the complete article here.
What are the key considerations when choosing sealcoating materials, and how do environmental regulations impact the selection process?
Selecting sealcoating materials involves choosing between refined tar, asphalt emulsion, or specialty resin based on factors like durability, environmental regulations, and local guidelines; it's essential to check specifications, including dilution options, for compliance.
Why is it necessary to apply two coats of sealcoat, and what are the benefits of this approach?
Applying two thin coats of sealcoat is crucial for longevity and even drying, preventing premature wear in high-traffic areas; using a sealcoat squeegee ensures a smooth application, reducing the risk of lumps and uneven layers.


