


View the complete article here.
Buying the right skid steer loader for the job is just the beginning. Ensuring you and your employees know how to operate that skid steer loader is critical to safety. It begins with a complete pre-inspection of the skid steer. This should be done at the beginning of each shift. In this article we cover many aspects of skid steer inspection. It is based on the Jurnee™ Training Kit offered by Vista Training.
Prepare for Inspection
You’ll want to park the skid steer loader in a safe location clear from obstructions and personnel. Look inside the cab and check that all brakes and hydraulic lockouts are set. Upon leaving the cab, implements are lowered to ground, or the boom is supported by the boom lock. Don’t forget to put on your personal protective equipment (PPE) gear before you begin.
Check for Damage
Inspect the machine for damage. Document all damage in the pre-use inspection log and report it to the supervisor. All damage should be noted in the inspection log even if it has been previously recorded.
Hand Holds and Steps
Check all hand holds and steps for damage. Check steps for mud or debris and clean if necessary.
Inspect ROPS / FOPS
Inspect the Roll Over Protection Structure (ROPS) and Falling Object Protection Structure (FOPS) for any signs of damage. Visually check the structure and welds for cracks. There should never be any welding, drilling, or other modifications made to the ROPS /FOPS as it could compromise its integrity. If any modifications are found, document them and advise your supervisor immediately.
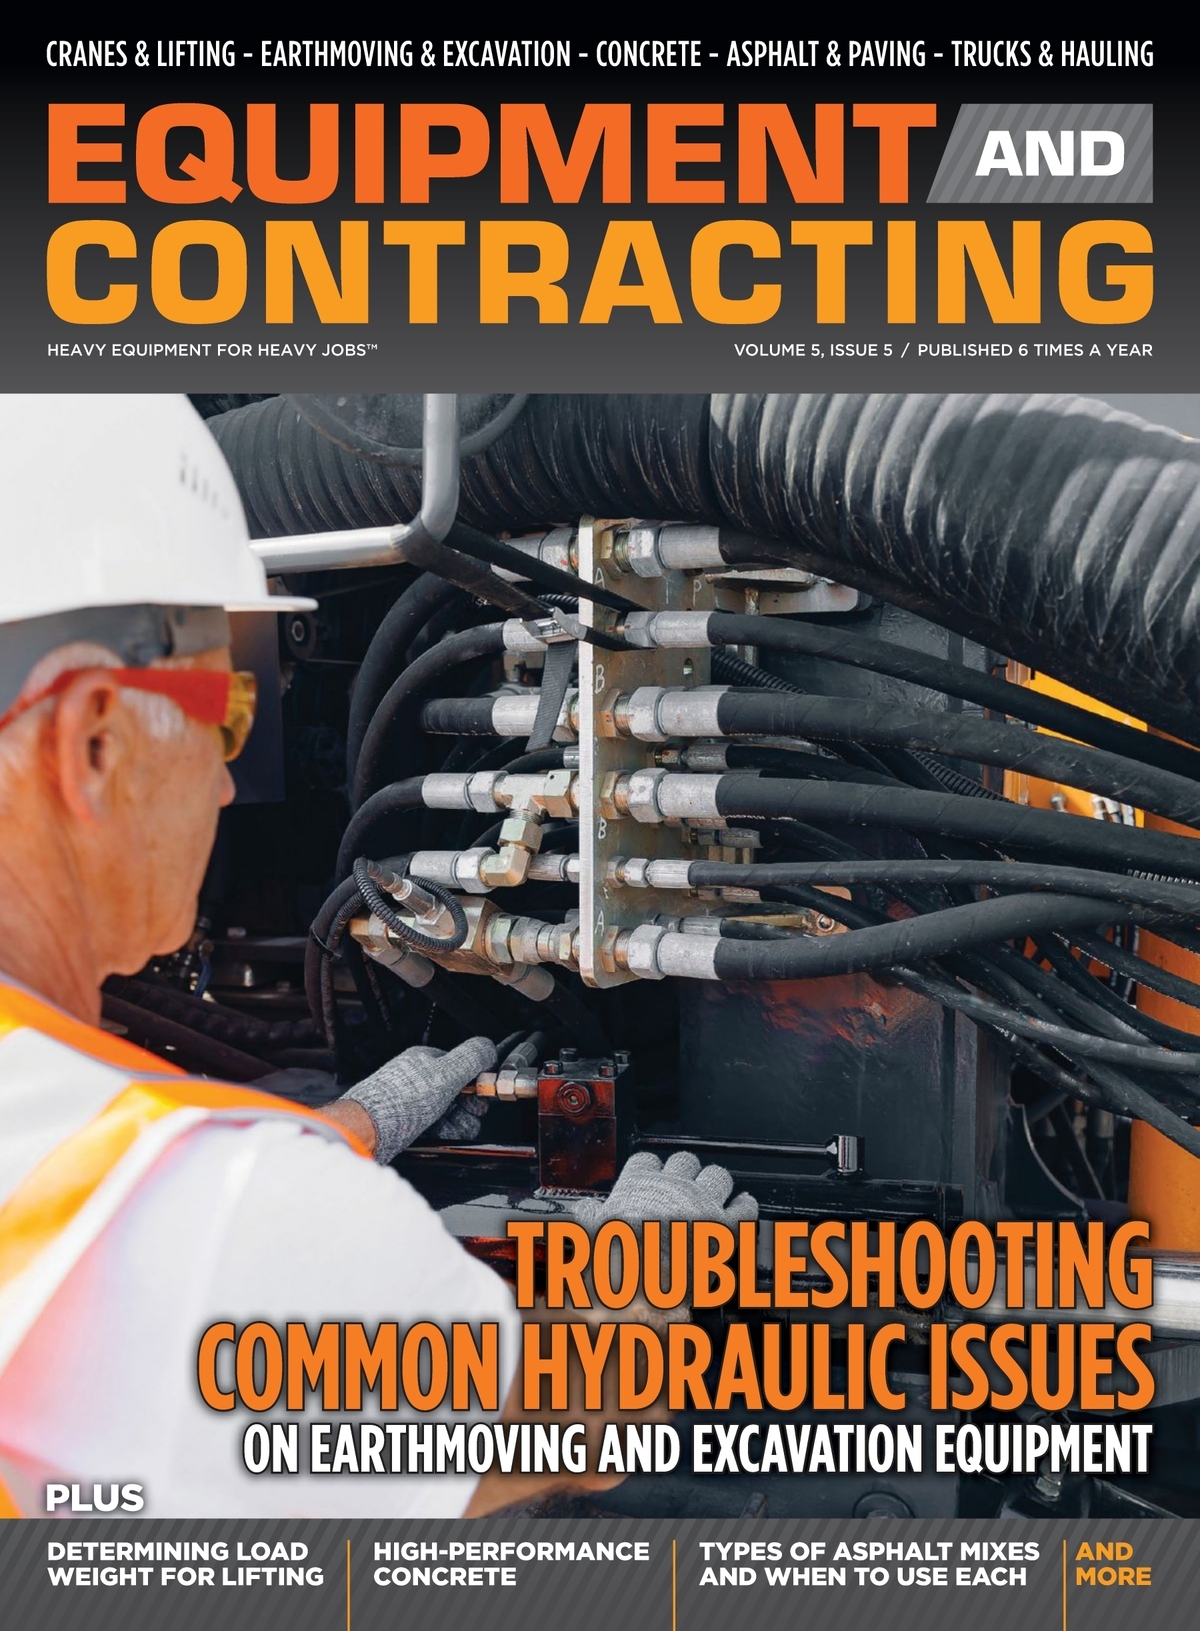
Boom and Attachments
The key problems you want to identify are leaks and excessive wear. There are several parts of the boom and attachments that can leak.
- Visually inspect hoist cylinders and hydraulic lines for damage or wear.
- Check cylinders for shaft seal leaks.
- Check hydraulic fittings for leaks.
- Visually inspect tilt cylinders and hydraulic lines for damage or wear.
- Check cylinders for shaft seal leaks.
- Check hydraulic fittings for leaks.
Inspect Attachment Retaining Pins
Visually inspect the attachment retaining pins. They must be fully extended to securely hold attachments.
Inspect Pins and Keepers
Check all pivot pins for grease. Ensure that the keepers that secure all pins are present. Note: Pins can be secured using different types of keepers such as set screws, snap rings, cotter pins, threaded nuts, or bolt and washer.
Check Boom and Mounts
Check that the boom pins are securely fastened and are not moving. Check boom pins for adequate lubrication. Check the condition and operation of the boom lock or support strut.
Inspect the Bucket
Check the bucket for cracks and excessive wear. Check the cutting edge for wear and ensure it is securely fastened to the bucket.
Check Forks and Carriage (Where Applicable)
Check the fork attachment for cracks or damage. Forks will show cracks generally where they turn up at the heel. Check the carriage for damage. Check the fork slide bar for lubrication and keeper pins. Ensure warning labels and weight capacities are legible.
Check Sweeper and Brushes (Where Applicable)
Ensure the brush hoses and electrical connections are secure. Check the hydraulic cylinders and mounts for damage. Check and grease all joints. Check the adjustment of the guides. They should be adjusted 3 to 4 inches above the sweeping surface.
Tracks
Inspect and document cuts, cracks, wear, tension, and material buildup on tracks. You may need to clean out the tracks, roller wheels, final drive sprocket area, and guide teeth. Inspect the drive sprocket for worn or broken teeth. You’re also looking for wear on the front and rear idlers and center rollers. They should be adequately lubricated and in alignment. Note that a wet, greasy appearance around the idler or roller shaft is likely a sign of a leaking seal.
Tires
Identify the type of tire being used, i.e., solid, foam filled, or air filled. Check tires for deep cuts in the face and side walls. Visually inspect the inflation of the tire. Check for damage to rims and ensure the lug nuts are in place and tight. A light film of rust ‘dust’ around a lug nut may indicate that it is loose.
Engine
There are several engine components you must inspect:
- Ensure the radiator is clean and that there is no apparent damage. If the radiator is plugged, it must be cleaned before operating to ensure proper engine cooling especially during the summer months.
- If equipped with a master switch, it must be in the ‘on’ position. Ensure the lockout cover (if equipped) is in place and operational.
- Check belts and pulleys for tension and wear or damage.
- Check for leaks. Pay special attention around ignition sources such as the exhaust.
- Check the exhaust system for leaks and fluid being sprayed on piping and manifolds. They are extremely hot and are an ignition source for misting flammables.
- Check all coolant hoses and lines for leaks, wear, or damage.
- Check hose clamps for tightness.
Fluid Levels
There are several fluids that must be at adequate levels to keep the engine from seizing. This is probably the simplest preventative maintenance you can perform on your skid steer loader.
- Check engine oil at the start of the shift and again when being fueled. Ensure it is between the ‘add’ and ‘full’ mark on the dip stick. Look for dilution of oil and check that antifreeze has not caused contamination (white froth), look for metal filings in the oil and check for a burnt odor.
- Check the hydraulic oil level at the start of the shift and again when being fueled. Hydraulic oil can be checked through a sight glass on the side of the hydraulic tank. The oil should be clear. If the oil is dark, it may be an indication of overheating.
- Check the coolant level in the overflow reservoir at the start of the shift and again when being fueled. Radiator is NOT to be opened if engine is running or hot – hot antifreeze can cause severe burns. Check the level and look for signs of oil contamination.
- Check the fuel level at start of each shift. Ensure the unit is kept adequately fueled during the day. Fill the tank at the end of your shift to reduce condensation.
Gauges and Electronic Warning System
The driver’s console is comprised of gauges, indicator lights, warning lights, and information displays. It is designed to inform the operator of the condition of the equipment and warn the operator when critical situations that could severely damage the equipment are present. Ensure that all gauges, indicator and warning lights and displays are functioning as follows:
- Perform a self-test
- When key is turned on, ensure all warning lights illuminate, and the audio alarm sounds.
- Check the warning lights. You’ll need to understand each of the symbols associated with the warning lights and indicators. Refer to the operator’s manual.
- Listen for an audio alarm. If a warning light comes on and the alarm sounds, the equipment must be immediately moved to a safe location and shut down.

Cab and Controls
Keep it Clean
Check the cab for cleanliness. Remove any bottles, cans, rocks, clothing, or other items that could impede the free movement of the throttle or control levers.
When equipped, all doors and windows should be clean and free from cracks or other damage.
Check the windshield wiper including the blades for wear or damage.
Safety Equipment
Check all hand and foot operated throttle, loader, traction, or other controls to ensure that they move freely and do not bind.
Inspect the seat belt for wear or damage. Check the seat belt buckle and ensure that it functions properly. When equipped, the seat restraint bar must operate freely. The machine must not start when the restraint bar is raised. The machine should start when the restraint bar is lowered to the operating position.
Always ensure the forward horn and backup alarm is working properly. They are safety devices, and the machine must not be operated unless they are audible.
Ensure the operator’s manual is in the cab of the machine and is in complete legible condition.
Climate Control
Ensure the heater and air conditioner are operating properly. Without sufficient heat in the winter it will be impossible to keep the windows clear which would create a hazardous driving condition.
Lights and Radio
All lights must be functioning properly and clearly visible. Check lenses for cracks or damage. Clean lenses if necessary.
Check the radio (if equipped) to ensure the correct channel is selected and the volume is adjusted to be heard over the noise of the engine.
Engine Tests
You will perform several engine tests with the machine running.
Check the Throttle
With the parking brake set, start the engine and independently work the hand and foot throttle from low to high idle. They should work smoothly through the full range. The hand throttle should maintain the engine speed wherever it is set.
Check the Ground Drive Controls
Release the parking brake and test the ground drive controls. Engage controls to move the machine slightly forward. Release controls. They should return to neutral and the machine should stop movement. Repeat the same test by moving the controls to reverse. The machine should again go to neutral and stop moving when the controls are released.
Check the Loader / Bucket Controls
Test the loader and bucket controls by fully raising and lowering the loader arms and dumping and curling the bucket. Then tilt the bucket forward and apply down pressure to the loader arms. The front of the machine should lift off the ground.
Perform a Parking Brake Test
Start the engine and set the throttle at low idle. With the parking brake set, attempt to engage ground drive controls. The machine should not move.
Fire Suppression
When equipped, the fire extinguisher should be securely fastened inside of the cab. Check the extinguisher and bracket for damage. Check the gauge on the fire extinguisher (it should be in the green area).
Pre-Use Inspection Log
Complete the pre-inspection log at the beginning of your shift. Document information regarding maintenance or problems that arise throughout the duration of your shift. Record work or repairs completed on the machine as well as any fuel and lubes added.
Conclusion
You now have an overview – and hopefully an appreciation – of what’s involved in performing a proper pre-inspection of a skid steer loader. All operators and field supervisors should be trained in how to conduct a safety inspection. Jurnee™ Vista Training offers a course completion certificate template to assist you with OSHA record-keeping requirements. High quality training keeps your employees safe and your skid steer loaders in good working condition.

View the complete article here.
Why is it important to inspect a skid steer loader before each shift?
Inspecting a skid steer loader before each shift is crucial for safety, identifying potential damage, and ensuring proper functionality, minimizing the risk of accidents.
What are the key components to check during a skid steer inspection?
During a skid steer inspection, key components include checking for damage, inspecting ROPS/FOPS for integrity, examining the boom, attachments, attachment retaining pins, tires, engine components, fluid levels, gauges, controls, safety equipment, and performing various engine tests to ensure proper operation.